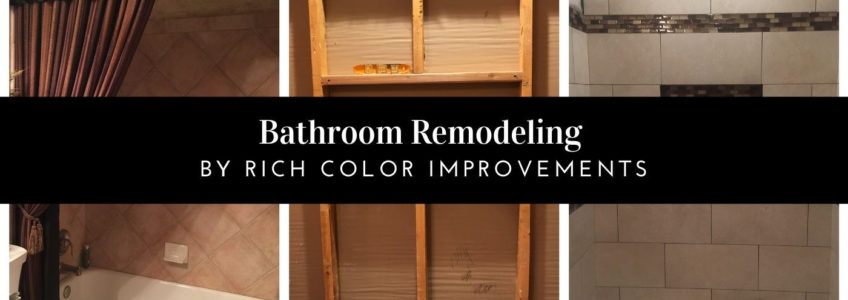
Bathroom Remodel | Converting A
Bathtub/Shower to Walk-in Shower
by Rich Color Improvements
The steps involved in converting a standard bath tub to a walk-in shower are a little messy and require time and some attention to detail. We’ve documented a conversion to show you how we can give you a beautiful and functional shower in place of your old bathtub.
Timeline
Our goal is always to complete our work as efficiently as we can to give you the use of your bathroom as quickly as we can, with most of the main work being completed by our tile installer. We suggest that you allow about 3-4 weeks from start to finish, depending upon whether we’re completing additional work to replace vanity cabinets or flooring in the room, and the complexity of the tile install for sizes and patterns. In a perfect world, you’ve got another bathroom to move into for the duration of this renovation work to reduce the inconvenience.
Design and planning
We’ll select and order your new shower fixture and tile products first to be sure that they’re on hand before we demo, so that we don’t lose time waiting for parts! Many of our clients find they’re overwhelmed with the selection process but also don’t think that they need to hire a professional designer. Finding photos of styles and designs that you like really help us to give you good advice and simplify the process. We can either make suggestions and bring you 2-3 samples that reflect your style and budget, or we can send you to our design showrooms for recommendations by our trade designers and you can see lots of beautiful products to select from.
(design concept and samples shots – not sure if the design concept will work, looks like she sent me a screen shot or something)
Demolition
We’ll ask you to help by removing any small or decorative items before we get started, and if the bathroom isn’t adjacent to a hallway we may also suggest that you also clear out the bedroom that we’ll need to go through while the work is in progress. It helps to throw some old sheets over the furniture to help collect dust from the demolition work.
We’ll want to cover the flooring between the bathroom and exit to the house so that we don’t scratch any wood floors or drop fine debris on carpet. We use different methods of covering the floors based upon what they’re made of; either plastic, tarps or construction paper for wood floors. We need to disconnect the plumbing and be sure that we can turn off the water without leaks, then take out the tub and tile including any sheetrock or backer, all the way down to the studs.
Plumbing
Next up, our licensed plumber will come to do our “rough-in work,” including replacing the tub/shower valve with a new shower valve and move the shower head and control lever water lines up for proper showering heights. He will also replace the drain, which sometimes involves jack-hammering up concrete to move it to an appropriate distance from the wall. We won’t know exactly what work he’s got to tackle until the demo is complete so that we can see under the tub and behind the wall. While this work is in progress, we’ll also look for any repair issues from the original home construction to make sure that all of the plumbing is sound before we start building.
Options for shower fixtures may include basic valve, fixture and shower head, to options for a rain head on a longer arm, multi-function heads or even handheld sprayers with single or multiple functions. It’s a popular option now to have a stationary rain head with a secondary handheld sprayer on a slide arm. Some of our favorite brands include Delta, Moen and Kohler while the finish of the fixture may be brushed nickel or stainless, oil rubbed bronze or chrome, depending upon whether you’re changing the bathroom to a new decor. With new shower fixture finishes, we’ll often also replace the sink faucet whether we replace and update the countertop at the same time, as well as hardware accessories like towel bars and light fixtures. They sky’s the limit based upon your budget and goals.
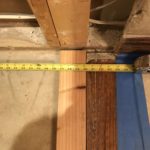
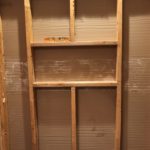
Built-out
To frame in the new shower, we’ll need to add boards at the open end of the alcove that will form the structure of the tiled curb which will have a shower pan liner wrapped around it. One of the most popular additions to a current shower is a shampoo niche. These convenient little cubbies allow for neat storage of your showering products. We’ll insert boards between the wall framing studs to create a niche or niches in a size that will best meet your needs. We’ll also need to add boards that might be necessary to support the new shower glass if we’re using a frameless surround since the glass is 1/2″ thick and very heavy. Last but not least, if we’re adding a shaving ledge or bench, this will be framed in so that the shower pan liner can go over it to protect from future leaks.
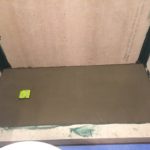
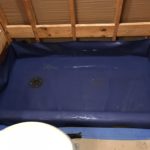
Shower Pan
What we refer to as the “shower pan” includes several components. With a “masonry poured pan,” we build-up a supportive base and then encase it in a rubber liner that goes about 12″ or so up the framing of the walls and over the curb studs and any shaving ledge or bench. The most important step at this stage is to perform a shower pan test before moving forward with the remaining build-out. We’ll stop up the drain and fill the pan liner with water overnight to check to be sure that the water line hasn’t gone down. Once we’re sure the pan is sound and doesn’t leak, we can carry on with the remaining build-out.
Backer and waterproofing
Where there are exposed studs, a 1/2″ concrete backer board is installed. Seams between backer panels are taped together and a waterproofing product is applied, and the final slope is added to the shower floor to insure proper drainage toward the drain. Then we’re ready for tile!
Tile installation
Tile sizes and patterns dictate how long the tile install takes. Basic tile sizes and patterns such as straight or offset with simple accent liners install more quickly. More intricate patterns like herringbone or accent murals are rather tedious and take longer to install. Larger tiles that are currently popular for a linear layout, like 12×24, are often heavier than smaller tiles and depending upon accents may require using a support board during installation until the setting adhesive dries. We prefer to select wall tiles that are available with an accompanying edge trim piece, so that once all of the tile is installed you don’t see the rough, unfinished edge of the tile. Many accent tiles come in various thicknesses, so selecting tile products that work together is important to reduce the chance of extra work during the install. Our installer can do virtually anything you like – expect more basic layouts to be most cost effective and fancier patterns to have a higher price tag. Working with natural stones such as marble are also a bit more labor intense and while beautiful, they’re also higher maintenance. We have quite a few manmade “marble look-alike” products that we love to use instead of natural stone inside showers.
Shower Glass
Our shower glass is custom fabricated to size so we can’t order the glass until the tile work is completed. Our technician will take final measurements and confirm the height of the new glass based upon the location of the shower head. If you find that you’d prefer taller or shorter glass panels, or a wider or narrower door, we’ll help explain how the size of the glass can help reduce splashing on your walls or floors and so that we don’t make a mistake by making the door so wide that it hits the toilet! The door hinges allow the door to swing both in and out of the shower for ease of access.The most popular glass is clear while we have options for obscure glass patterns such as rain or frosted glass, as well as options for adding a towel bar or hook in the glass. Since the entire glass surround needs to be tempered to make it safety glass, it takes between 7-10 days to have it cut and fired before it’s ready for install. The door will be hinged against a wall (where we’ve added support studs if needed) or if a center door is preferred and feasible, we’ll need to add a transom over the door to hold everything together.
Grouting and caulking
When we’re using man made tiles such as porcelain or ceramic, we prefer to use a specialty grout with an incorporated sealer to reduce annual maintenance. We can help you to select a grout color either along with your initial tile selection or as the install is underway so that you’ve got a chance to see it in progress in your bathroom. We’ll use matching colored silicone caulking on the corners inside the shower and around any niches, ledges or benches.
Finishout
While we’re waiting for glass and once the grout and caulking are dried, the plumber returns for his “trim out” trip. He’ll add the shower head, control handle, and any accessories like handheld sprayers as well as the drain cover grid. If we’ve had to remove the toilet to complete the conversion work or if we’ve replaced countertops during the shower conversion, he’ll also hook those up and then check out all of the new plumbing work to be sure that it functions properly, and that the hot and cold water work as they should. If we’re also painting, then the painters are the last crew on the job and will address any details including repairs from the demo and construction, and either touchups or new textures and finishes. At this time, we’ll do a basic “construction cleanup,” and you’re ready to have your housekeepers do a deep cleaning.
Glass install
The shower glass is installed by our professional technicians with a silicone caulking around all of the edges. A basic tub to shower conversion an “in-line” surround with only a door and one stationary glass panel, so we’ll need your help to insure a couple of things. The stationary panel should be left un-touched for about 48 hours so that it doesn’t wiggle and loosen up the wet silicone. Don’t worry, the installers have cleaned the glass well before adding the silicone, so it should be pretty and clean. Don’t expose the shower to water for 24-48 hours while the silicone dries thoroughly. This may be the hardest part of the project because your new shower will be so gorgeous that you’ll want to jump right in!!
Since 1996 Rich Color Improvements is an established full-service Lewisville home remodeling business that provides services to residential and commercial customers in the Lewisville and surrounding area. We offer quality services and products without compromise – just ask our customers! Serving our clients since 1996, we have completed projects ranging from repairs and painting to complete kitchen and bath remodels, and everything in between. We take your vision and “build on it” . . . helping you love your home is our mission. Rich Color is dedicated to the satisfaction of each and every home or business owner we work with.